
actual
US /ˈæktʃuəl/
UK /ˈæktʃuəl/
- adj.実際の;現在の
A2 初級TOEICもっと見るaluminium
US /ˌæljəˈmɪniəm/
UK /ˌæljəˈmɪniəm/
- n. (u.)アルミニウム
B2 中上級もっと見るback into
US /bæk ˈɪntu/
UK /bæk ˈɪntuː/
- phr. v.~にバックで入る;~にバックでぶつかる
A1 初級もっと見るbench
US /bɛntʃ/
UK /bentʃ/
- n.判事席;ベンチ;選手が座る席
- v.t.(試合に出さないで)ベンチに座らせる
B1 中級もっと見るcheck out
US /tʃɛk aʊt/
UK /tʃek aut/
- phr.チェックアウト
- phr. v.調べる;本を借り出す;チェックアウトする;見てみる
- v.t./i.チェックアウトする;確認する;(図書館から本を)借り出す;見てみる
A1 初級もっと見るconfident
US /ˈkɑnfɪdənt/
UK /ˈkɒnfɪdənt/
- adj.自信のある;確信している;楽観的な;大胆な
- n.自信家
A2 初級もっと見るcontrast
US /ˈkɑ:ntræst/
UK /'kɒntrɑ:st/
- v.t./i.対照させる
- n. (c./u.)対比;コントラスト
- v.i.対照をなす;対照をなす
A2 初級もっと見るcut out
US /kʌt aʊt/
UK /kʌt aut/
- phr. v.疎外される;切り取る;やめる;切り取る;立ち去る;停止する
- v.t./i.やめる;向いていない
- v.t.切り取る
- v.i.(エンジンが)停止する
- adj.向いている
A1 初級もっと見るdessert
US /dɪˈzɜ:rt/
UK /dɪˈzɜ:t/
- n.デザート
B2 中上級もっと見るdrizzle
US /'drɪzl/
UK /ˈdrɪzl/
- n. (u.)霧雨
B2 中上級もっと見るexact
US /ɪɡˈzækt/
UK /ɪɡ'zækt/
- adj.正確な : 精密な
- v.t.(力ずくで)~を取り立てる : (強制的に)~を取り出す
A2 初級TOEICもっと見るexcess
US /ˈɛkˌsɛs/
UK /ɪkˈses/
- n. (c./u.)過剰;余剰;過度な行為;免責金額
- v.t./i.上回る
B1 中級もっと見るfancy
US /ˈfænsi/
UK /'fænsɪ/
- v.t./i.好む : ~したい気がする;想像する、空想する;想像した、空想した
- adj.派手な : 装飾的な : しゃれた
A2 初級TOEICもっと見るfirm
US /fɚm/
UK /fɜ:m/
- n. (c.)商会 : 会社
- adj.堅い;頑丈な;固い
- v.t.固める : 安定させる
A2 初級TOEICもっと見るflat
US /flæt/
UK /flæt/
- n. (c./u.)アパート;平ら;フラット;フラットシューズ
- v.t./i.アパートに同居する;不発に終わる
- adv.はっきりした;平に
- adj.平らな;活気のない;ぺちゃんこの;炭酸が抜けた;一定の;つや消しの;単調な;平面的
A2 初級もっと見るfoil
US /fɔɪl/
UK /fɔɪl/
- v.t.(企てを)くじく
- n. (u.)ホイル
B2 中上級TOEICもっと見るfreezer
US /ˈfrizɚ/
UK /ˈfri:zə(r)/
- n. (c.)冷凍庫
B1 中級もっと見るgo around
US /ɡo əˈraʊnd/
UK /ɡəu əˈraund/
- phr. v.(ニュース : 噂が)知れ渡る : 広まる;あちこちに行く : 歩き回る
A1 初級もっと見るjazz up
US
UK
- phr. v.活気づける
A1 初級もっと見るlift
US /lɪft/
UK /lɪft/
- n.車に乗せること;リフト : 昇降機;持ち上げること : 上昇させること
- v.t.取り消す;持ち上げる;増やす,増加させる;取り除く
A2 初級もっと見るlook at
US /lʊk æt/
UK /luk æt/
- phr. v.見る;注目する;見る;調べる
A1 初級もっと見るmat
US /mæt/
UK /mæt/
- n. (c./u.)床マット;ランチョンマット;もつれた塊
B1 中級もっと見るmelt
US /mɛlt/
UK /melt/
- v.t./i.溶ける;溶かす;溶ける;和らぐ
- n. (u.)溶解物
- n. (c.)メルトサンド
B1 中級もっと見るminimum
US /ˈmɪnəməm/
UK /ˈmɪnɪməm/
- n. (c./u.)最小限;最低気温;最小限の努力;最小値
- adj.最小の;最小限の資源;最小限のリスク
B1 中級TOEICもっと見るmousse
US /mus/
UK /mu:s/
- n. (c./u.)ムース;ムース
C1 上級もっと見るoff the air
US
UK
- phr.放送休止
- adj.放送終了
A2 初級もっと見るon the bench
US
UK
- phr.ベンチ入りで;裁判官席について;ベンチに座って
A1 初級もっと見るout of it
US /aʊt ʌv ɪt/
UK /aut ɔv it/
- adj.意識がない;ぼんやりしている
A1 初級もっと見るoval
US /ˈoʊvl/
UK /ˈəʊvl/
- adj.卵形の : 長円形の : 楕円形の;卵型の顔
- n. (c./u.)楕円;オーバル、スポーツの会場;卵形
B1 中級もっと見るover the top
US /ˈovɚ ði tɑp/
UK /ˈəuvə ðə tɔp/
- adj.大げさな;度が過ぎて不快な
- adv.過剰に
A1 初級もっと見るpalette
US /ˈpælɪt/
UK /ˈpælət/
- n. (c.)パレット
B1 中級もっと見るpattern
US /ˈpætən/
UK /'pætn/
- n. (c./u.)模範 : 見本;模様 : 柄;様式;規則性;型紙
- v.t.模倣する;模様をつける
A2 初級TOEICもっと見るpeel
US /pil/
UK /pi:l/
- n. (c./u.)皮
- v.t.皮をむく;覆いを取る
- v.i.皮がむける
B1 中級もっと見るpeel back
US
UK
- phr. v.明らかにする
A1 初級もっと見るpeel off
US /pil ɔf/
UK /pi:l ɔf/
- phr. v.剥がれる;剥がす;離脱する
A2 初級もっと見るpesticide
US /ˈpɛstɪˌsaɪd/
UK /ˈpestɪsaɪd/
- n. (c./u.)農薬;殺虫剤管理;特定の殺虫剤;殺虫剤の施用
- adj.殺虫剤の;殺虫剤の
B2 中上級もっと見るpop
US /pɑp/
UK /pɒp/
- v.t./i.飛び出す;立ち寄る;入れる;飛び出る;目立つ;尋ねる
- n. (c./u.)ソーダ;ポン;お父さん;ポップス
- adj.ポップス;ポピュラー
B2 中上級もっと見るpressure
US /ˈprɛʃɚ/
UK /'preʃə(r)/
- n. (c./u.)重圧 : プレッシャー;圧力;説得;プレッシャー;圧力 (物理);圧力 (印刷);時間的プレッシャー;政治的圧力;血圧
- v.t.圧力をかける;強く説得する
A2 初級TOEICもっと見るprint out
US /prɪnt aʊt/
UK /print aut/
- phr. v.印刷する
A1 初級もっと見るprintable
US /ˈprɪntəbəl/
UK /'prɪntəbl/
- adj.印刷可能な : 出版に適した
B2 中上級もっと見るscrape
US /skrep/
UK /skreɪp/
- v.t./i.こそぎとる : はがしとる;表面を傷つけるように動く;傷つける;えぐる
- n.不幸な出来事;ものを引きずる音
B1 中級もっと見るskinny
US /ˈskɪni/
UK /'skɪnɪ/
- adj.非常に痩せている
B2 中上級もっと見るsnap
US /snæp/
UK /snæp/
- v.t./i.かみつく;ポキッと折る : プツンと切る;堪忍袋の緒が切れる
- n. (c.)スナップ写真
B1 中級もっと見るsolid
US /ˈsɑlɪd/
UK /'sɒlɪd/
- adj.確かな;固形物;頑丈につくられた;隙間がない;固形物の
- n.固体
A2 初級もっと見るspread
US /sprɛd/
UK /spred/
- n. (c./u.)食べ物の盛り付け;間隔;パンに塗る(ようにしてのせる)もの;流行;範囲
- v.t./i.広げる : 広がる;広まる;広範囲に散る
- v.t.薄く表面に塗る
- v.i.広がる;人に知られる
A2 初級TOEICもっと見るstem
US /stɛm/
UK /stem/
- n. (c./u.)(植物の)茎 : 柄 : 葉柄;幹 : 《道具の》 柄;語源
- v.t.の軸を取り去る;食い止める
- v.i.始まる : 起因する
B1 中級TOEICもっと見るstick
US /stɪk/
UK /stɪk/
- v.t./i.突き刺す : 刺し込む;貼る : くっつける;とどまる;突き出す;我慢する
- n. (c.)棒
A2 初級もっと見るstrength
US /strɛŋkθ, strɛŋθ, strɛnθ/
UK /streŋθ/
- n. (c./u.)力;体力;精神力;長所;兵力
A2 初級TOEICもっと見るsubscribe
US /səbˈskraɪb/
UK /səb'skraɪb/
- v.t./i.(定期的なサービスに)申し込む : 予約をする : 予約金を払う
B1 中級TOEICもっと見るtemper
US /ˈtɛmpɚ/
UK /ˈtempə(r)/
- n. (c./u.)気性;気質;気質;かんしゃく
- v.t.和らげる;鋼鉄に熱処理を加える;和らげる;焼き入れする
B1 中級TOEICもっと見るtemplate
US /ˈtɛmplɪt/
UK /'templeɪt/
- n.雛形;雛形
B2 中上級もっと見るtexture
US /ˈtɛkstʃɚ/
UK /ˈtekstʃə(r)/
- n. (c./u.)音楽などの雰囲気;手触り
- v.t.質感を持たせる
B1 中級もっと見るto let
US /tu lɛt/
UK /tu let/
- prep.賃貸用の、貸し出し中
A2 初級もっと見るtrick
US /trɪk/
UK /trɪk/
- v.t.だます;笑わす
- n. (c./u.)トリック;腕の良いやり方;技
- adj.迷わせる
A2 初級もっと見る
Vocabulary
- over the top: 大げさな
- peel off: 剥がれる
- jazz up: 活気づける
- print out: 印刷する
- to let: 賃貸用の、貸し出し中
- go around: (ニュース : 噂が)知れ渡る : 広まる
- peel back: 明らかにする
- look at: 見る
- back into: ~にバックで入る
- on the bench: ベンチ入りで
- cut out: 疎外される
- out of it: 意識がない
- off the air: 放送休止
- check out: チェックアウト
- subscribe: (定期的なサービスに)申し込む : 予約をする : 予約金を払う
- stick: 突き刺す : 刺し込む
- pattern: 模範 : 見本
- trick: だます
- strength: 力
- fancy: 好む : ~したい気がする
- texture: 音楽などの雰囲気
- exact: 正確な : 精密な
- confident: 自信のある
- amount: 量 : (金)額
- solid: 確かな
- spread: 食べ物の盛り付け
- pressure: 重圧 : プレッシャー
- flat: アパート
- firm: 商会 : 会社
- draw: 引く
- effect: 効果
- excess: 過剰
- snap: かみつく
- stem: (植物の)茎 : 柄 : 葉柄
- contrast: 対照させる
- apply: 塗る
- actual: 実際の
- lift: 車に乗せること
- template: 雛形
- shape: 形
- click: 意気投合する
- pop: 飛び出す
- peel: 皮
- place: (人をある状態に)置く
- fully: 完全に : 十分に
- continue: 続ける
- melt: 溶ける
- scrape: こそぎとる : はがしとる
- palette: パレット
- temper: 気性
- stand: (選挙に)出馬する : 立候補する
- make: 用意する
- set: 準備ができている
- pesticide: 農薬
- minimum: 最小限
- front: 見せかけ : 装い
- skinny: 非常に痩せている
- cover: (歌を)カバーする
- dessert: デザート
- drizzle: 霧雨
- design: デザインする
- foil: (企てを)くじく
- oval: 卵形の : 長円形の : 楕円形の
- bench: 判事席
- mat: 床マット
- freezer: 冷凍庫
- mousse: ムース
- aluminium: アルミニウム
- printable: 印刷可能な : 出版に適した
アプリで完全な体験を
いつでもどこでも学習、文章と使い方を詳しく解説
01:03
She took a brave step forward, leaving behind her comfort zone to chase her dreams.
単語・フレーズ
- brave
adj. 勇気のある
- comfort zone
phr. コンフォートゾーン
文の解説
a brave step は名詞句で、brave は形容詞として名詞 step を修飾し、「勇敢な一歩」を意味します。
forward は副詞として step を修飾し、「前へ」を意味します。
この句全体が目的語となり、took(動詞)の「何を」に答えています——彼女は勇敢な一歩を前へ踏み出した。
アプリで完全な体験を
いつでも単語を調べて、発音・品詞・使い方をマスター
brave
US/brev/
UK/breɪv/
adj.勇敢な
v.t.勇敢に立ち向かう
A2 初級
アプリで完全な体験を
いつでもどこでもスピーキング練習、即時に発音フィードバック
Try this speaking exercise.
この文を真似して練習してみましょう。
80
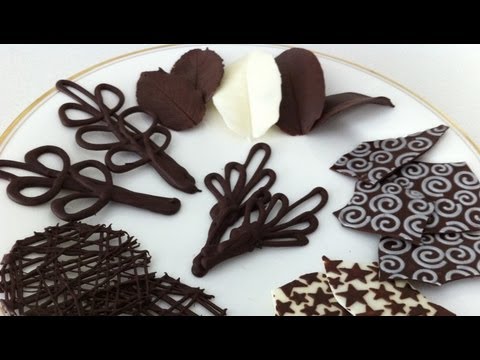
チョコレートの飾り付けデコレーションチュートリアルパート2 料理方法 アン・リードン (how to make chocolate garnishes decorations tutorial PART 2 how to cook that ann reardon)
0
尤弘志 が 2021 年 01 月 14 日 に投稿お菓子を華やかに飾りたいと思いませんか?この動画では、美しいチョコレートの葉っぱや、2色のチョコレートデザイン、繊細なチョコレートレースの作り方を紹介しています。カップケーキやデザートをレベルアップさせるのにぴったりですよ!デコレーションのコツと、簡単な英文法を楽しく学べます。
この動画をアプリで学ぼう!
VoiceTubeアプリ版なら、効果的な学習機能がもっと充実しています!