Placeholder Image

字幕表 動画を再生する

  • Welcome to How To Cook That I am Ann Reardon

  • Today we are making a Jimmy Choo shoe cake.

  • There have been lots of requests for a shoe cake tutorial and Lisa has been requesting

  • a pillow cake every week since May so I have combined the two.

  • I will show you how to make the shoe first and then the pillow.

  • First thing you need to do is cut out your shoe template, that is available on the website

  • howtocookthat.net there's a link in the description below this video.

  • Once you have cut it out also cut an sole from some thin cardboard so we can use it

  • as a support while the fondant is drying.

  • You will also need to cut a couple of other things out of cardboard and staple them together

  • where shown.

  • Place a stack of books on a baking tray and using your template for the side profile of

  • the shoe match them up to the right height and then open the cover of the top book and

  • prop it up to the right angle using tissues or paper towel inside the book.

  • Then take the cardboard sole and bend it to match the side profile of the shoe, set it

  • up on the books and tape it into place.

  • Take some non-stick baking paper and place that over the top so that the fondant doesn't

  • stick to the template.

  • Now to make your buckle, place some baking paper over your template and roll out a thin

  • even snake out of black fondant.

  • Then using a knife to help you bend the corners to match outer size of the template, trim

  • it to the right size and join the two ends together in the middle of one of the sides.

  • Then use an off cut to make the prong of the buckle.

  • Then take a dry paintbrush and dust that fondant with silver luster dust on all the edges and

  • then leave the buckle to one side to dry.

  • Next to make our label roll out some white fondant really thinly, put your template over

  • the top and cut out the rectangle shape.

  • Next take a sharp pencil and trace over the letters of the logo pressing reasonably firmly.

  • When you remove the paper you will be able to see a light indent that will guide you

  • to where to put the letters.

  • You can either paint them on using black gel food colour or you can use an edible marker

  • to write them on.

  • To be honest I had never heard of Jimmy Choo before making this cake, I just searched for

  • expensive shoe brands and found one that I thought would look pretty on a cake.

  • If you want someone who does know a lot about fashion and make up then check out beautiful

  • Carah's channel, her channel is called Carah Amelie she has studied apparel design and

  • cosmetology and has been a licensed cosmetologist for the last 8 years so she really knows her

  • stuff.

  • She has heaps of great get ready with me videos and skin care, hair and makeup tutorials and

  • some creative hair ups.

  • As always I'll put a link in the description below the video and I'll add one to her channel

  • at the end of this video as well so, make sure you check it out and let her know in

  • the comments that 'how to cook that' sent you over.

  • Next roll out some black fondant to be half a centimeter thick and cut around the outer

  • sole template line.

  • After you've cut it run the flat edge of your knife around it to smooth off any imperfections.

  • Roll out some cream fondant and cut the inner sole template size.

  • Rub a tiny amount of water onto the black sole and add the cream sole over the top,

  • if it stretches a little as you add it like mine did add your template back over the top

  • and trim it to shape.

  • Take your toe template and trim across the cream toes section and remove that bit.

  • Line up your fondant sole with the sole that we made out of cardboard and put it into place

  • so that it is going to dry in the right shape.

  • Dab a little bit of water on the top section and add your label.

  • Take the tip of a knife and gently make stitching indents across the top and base of the label.

  • You can see here the sole has little crease marks in the fondant at the bend, if you want

  • to avoid that put the black sole onto the support first and then add the cream sole

  • once it is in place.

  • Now to make the toe.

  • This shoe uses snake skin, you can buy expensive snake skin texture mats but here I ma just

  • going o use a plastic texture mat that I use for chocolate as well.

  • You get all of these texture mats in the back of one book, whenever I mention them in a

  • video people always ask what was the book and where did you get it from so I will put

  • a link to that particular one in the description below the video so you know which one it is

  • it costs about $8 for the book.

  • Roll out your black fondant and then place a texture mat over the top and roll over it

  • to make the imprint on the fondant, then remove the template.

  • Then using the toe template cut along the top of the toe shape of it but leave the rest

  • of it.

  • Add it to the toe lining it up with the cream shoe lining.

  • And then use your finger to smooth it down and around the toe and trim it off at the

  • base.

  • The top angle of the heel to match the base of the shoe angle so they can join together

  • nicely.

  • So to make that take a thin book and prop it open so that it matches to side profile

  • of the heel that I have given you.

  • Then add the heel template and double check the angle is correct and tape it into place.

  • Roll out a thick snake of black fondant and then using the palm of your hand push down

  • on one side as you roll to make it skinny one one side.

  • Place it on the template and then roll it some more until it matches the shape.

  • Use a knife to cut the angle of the top of the heel then mold to the right shape using

  • your fingers.

  • Do you know how much these shoes actually costs to buy? the real one I mean not the

  • cake.

  • Let me know what you think in the comments below how expensive is too expensive for a

  • shoe and do you have a favourite shoe brand that you like to wear?

  • Trim the end of the heel using a knife and then make an indent at the base of the heel.

  • Next we are going to make the ankle strap roll out some black fondant add a thin layer

  • of cream to the underside and then rub the texture mat on the black side of it.

  • Using the ankle strap template cut out a long strip and wrap it around your cardboard support

  • that is covered in baking paper.

  • Then using the back of a knife make two indents near the end of the strap and add your buckle

  • into place.

  • Use a tooth pick to make a hole and then add the other piece into the hole.

  • So that it looks like this.

  • After a couple of days once those pieces are dry take a some black fondant and using the

  • back of a spoon mix into a thick paste with a little water.

  • Use the paste to glue the heel to the shoe.

  • If you are in a hurry you can mix some tylose powder into your fondant to make these pieces

  • set faster but that also means you need to work faster when making your shapes.

  • Use something to support the shoe while it sets and leave it to set for an hour you can

  • be work on your actual cake while you wait for this or if you are making it ahead then

  • just take a break.

  • Roll a snake out of black fondant and add it to the underside of the shoe where the

  • heel joins the sole and smooth it around, then trim off the excess.

  • Take a toothpick and poke it into the shoe on almost an upright angle.

  • Then sit the cardboard support over the top.

  • Roll out some black and some then some thin cream fondant.

  • Using a tiny bit of water put the cream onto the black, then flip it over and rub the texture

  • mat on top.

  • Cut it out using the template.

  • Use your knife to indent down the back in two straight lines and then use the very tip

  • of the knife to make stitching marks down the middle.

  • Add a little water along the base and put into place resting it on the card.

  • Now I should have covered the card here in baking paper because my fondant stuck when

  • I tried to take it off so make sure you don't forget to add the baking paper.

  • Next to make the lower strap roll the black and cream fondant just like we have before

  • but this time you don't need the texture mat because this bit is made out of satin.

  • Cut out the shape and you can use a roll of card here or bunch of tissues might be easier.

  • Rest the strap over the top and join it at each side using a little water.

  • Repeat that process for the middle strap adding some tissues for support.

  • Measure using you template to make sure they are the right size and then add the fondant

  • strap dampening the ends with a little water.

  • Carefully line up the edge and gently push it into place.

  • And yes you guessed it leave it out to dry, now this fondant is only thin and it was a

  • really hot day here so i was able to take the supports away after a couple of hours

  • but to be safe I'd suggest you leave it longer.

  • If you keep one of your strap off cuts you can use that to see if it is dry enough you

  • can test it and see if it will hold its shape.

  • Carefully remove the back support and then stack up some items to make supports of equal

  • height to balance a ruler on.

  • This is to hold the ankle strap in place while it sets.

  • Then add some of your black paste and loop it around the back of the shoe, with the buckle

  • on one side towards the back.

  • You could leave this shoe just like that or customize it and add your own decorations

  • like flowers or whatever the birthday girl likes.

  • But we are going to continue to decorate it like the Jimmy Choo shoe, so to do that remove

  • your other supports and using your template make your centre vertical strap just like

  • we made the others.

  • Slightly dampen the top of the strap and then the top of the bottom two loops that are on

  • the shoe.

  • Attach it underneath the ankle strap and over the other two loops.

  • Now to make our razor sequins that decorate the shoe.

  • Staring with the black cut a thin strip, segment it and cut one end into a point.

  • Add a little water and gently place them onto the shoe.

  • Make another layer that overlaps the first and then repeat that going up the shoe changing

  • to blue then greens and then back to the black.

  • Then we want to leave that to dry out, the longer you leave it the stronger the shoe

  • will be.

  • For the pillow cake itself bake 4 quantities of my red velvet cup cake recipe in a tray

  • and then let them cool.

  • Trim off the edges and then make yourself a square template that you can use, mine is

  • 23cm by 23cm.

  • Put a smear of cream cheese frosting onto the base and cut a square of cake and add

  • it to the cake board.

  • Add a thin layer of cream cheese frosting, each time you cut a square you are left with

  • off cuts that you can join two of those together to make another square so you can use those

  • for alternate layers.

  • Use your knife to level them off if they are not quite even.

  • Add another layer of cream cheese frosting and continue to stack the cakes up in this

  • way.

  • My red velvet cake recipe and the frosting recipes are all on the blog howtocookthat.net

  • if you go to the shoe cake page which is in the link below this video I will link to all

  • the recipes that you need from there.

  • Keep going until it is around 8 cm tall.

  • When we carve the top of the cake we want to come down just past half way down to about

  • 3cm we don't want it exactly in the middle because pillows squash down when you put them

  • down on something.

  • Fold your square template in half and then in half again to make a smaller square and

  • place that in the centre of your cake.

  • Starting with the corners carve down on an angle down through the layers to the 3 cm

  • level that we looked at not right down to the bottom.

  • Then repeat that on each of the corners and then on each of the sides, cutting down on

  • an angle just down to the 3cm level.

  • Next use your knife to shave off thin layers of cake at a time to round off your pillow,

  • we don't want hard angles.

  • We don't want it to look like a rock we want it to look like a soft pillow.

  • So round it up to the top.

  • Then looking at your cake from above curve it in slightly at the sides.

  • Not too much just a little bit.

  • Now for the underneath, from just below that 3cm line trim down on an angle towards the

  • cake board at each corner and then along the sides.

  • Next the key to making it look soft and pillow like is giving it some creases.

  • Grab a pillow and have a look at how it sits and where the creases are.

  • Using your knife take some chunks out of the sides to give it that look.

  • If you don't do this your pillow will look a bit solid.

  • Clean up all of your crumbs and then cover the whole cake in frosting and put in the

  • fridge to firm up.

  • I am using the cream cheese frosting on the outside here too, it is quite a soft frosting

  • so if you are new to cake decorating I suggest you use one of the buttercream recipes on

  • the website instead for the outside just to make it a bit easier for yourself.

  • Roll out some fondant in the colour that you want your pillow to be and cut a long strip.

  • Place it under one side and press it onto the frosting.

  • Using scissors trim it at the corners and long the cake at the 3 cm level.

  • Repeat that on each side and then cover the top of the cake in fondant, you can use a

  • contrasting colour here or you could rub it with a texture mat you can use whatever you

  • want to customise your pillow.

  • Then use a ball of fondant to smooth out the fondant and push it into those creases that

  • we made.

  • Then run your finger along to find the edge of the bottom fondant and trim it up using

  • your scissors.

  • Next to make the edging you can do that by hand by rolling two snakes for fondant and

  • twisting them together.

  • Or you can use a fondant extruder with a plate that looks like this one.

  • I will link you to where I bought this one online in the description below the video

  • I have only recently bought one and they are very handy.

  • You just roll out the fondant into a thick snake, place it into the tube, screw the end

  • and then turn the handle and it pushes the fondant out.

  • Then for this pattern I want you to twist the cord in opposite directions on each end

  • so that it looks like cord.

  • Then take some gold luster dust and brush it on using a paint brush.

  • Add some water along the edge of your pillow and put some cord on using toothpicks to hold

  • it in place while that water fuses it to the side of the cake.

  • Then using the fondant extruder again fitted with the small circle tip squeeze out some

  • thin spaghetti looking pieces of fondant , dust them with gold, twist the top and place them

  • onto the corners of the cake.

  • Remove your toothpicks.

  • Then measure roughly where the shoe will sit and make a little indent on the cake, this

  • helps the shoe sit securely but also makes the pillow look soft because if you put something

  • on a soft pillow it sinks down into it a little bit.

  • Then add your shoe on top and your cake is ready to serve.

  • Thanks for watching, you can put your requests in the comments below and subscribe for more

  • cake tutorials, chocolate decorating lessons and desserts.

  • Don't forget to check out Carahs channel and tell her how to cook that sent you.

  • Have a great week and I'll see you next Friday.

  • [music The Boat Song by youtube.com/setsailtv]

Welcome to How To Cook That I am Ann Reardon

字幕と単語

ワンタップで英和辞典検索 単語をクリックすると、意味が表示されます

B1 中級

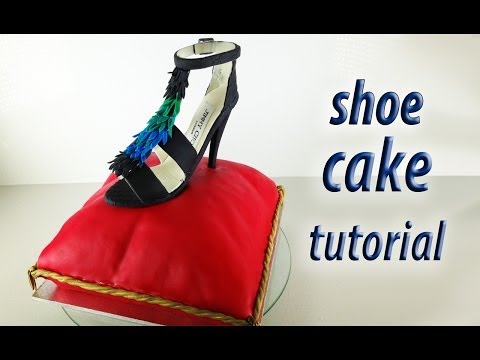
スティレットの靴のケーキのチュートリアルフォンダン枕ケーキ アンReardonケーキの装飾を調理する方法 (Stiletto Shoe Cake Tutorial Fondant Pillow Cake HOW TO COOK THAT Ann Reardon Cake Decorating)

  • 71 4
    pikachu に公開 2021 年 01 月 14 日
動画の中の単語