Placeholder Image

字幕表 動画を再生する

  • Welcome to how to cook that I am ann reardon.

  • Today I am going to show you how to make a minion cake.

  • I have had requests for how to make a 3D cake that stands up and other requests for a despicable

  • me cake, so here is 10 steps to make a 3D standing up minion cake.

  • STEP ONE: You need to make a template for any 3D cake that you want to make.

  • So find a character that you want to make, get a picture of them, blow it up bigger in

  • word or whatever computer program you have and print it out in the size that you want

  • your cake to be.

  • And then you can use that as a guide for how big the actual cake is but also how big all

  • the details on your cake are going to be as well.

  • STEP TWO: Make your details.

  • Now fondant details can be made up to a month in advance and left out to dry.

  • Use the printout that you made of your character to guide you in what size to make them.

  • If you have never worked with fondant before at the end of this video click on the banner

  • to go to the howtocookthat channel and there is a fondant basics video and fondant recipe

  • video or if you are on your phone then at the end of the video just click on howtocookthat

  • below the video to go to the channel.

  • To make the pupil of the minion eye roll out some brown fondant and using a piping tip

  • to cut out a circle.

  • Roll out some black and cut out a smaller circle and place it in the centre of the eye.

  • You will notice I am making two even though I only need one, but I like to make spares

  • of these pieces that I am making ahead just incase one gets broken or dropped on the floor

  • or something like that.

  • Take some black gel colour and paint lines around the edges of the eye to make it look

  • more realistic.

  • And then take a tiny bit of white and put on the top edge of the black to give that

  • reflection that makes it look a bit more alive.

  • To make the goggle you are going to have to find something in your kitchen that is the

  • right size and then wrap it around in non-stick baking paper.

  • Roll out some black fondant and wrap that around the bottle and then stand the bottle

  • upright.

  • I like to use something to hold the knife in place otherwise it always goes crooked

  • and then just keep the knife still and turn the bottle around to make a straight edge

  • at the top and the bottom.

  • To make the front of the goggle cut out a circle the size of your bottle and then cut

  • out a smaller circle from the centre of that.

  • Then take some edible silver luster dust, someone asked me where you get that from.

  • Cake decorating stores will have all of this sort of thing, if you don't have a cake decorating

  • store near you then there's heaps of them online, just google it and you will find some.

  • Then you just get a dry paintbrush dust dip it in your lustre dust and brush it on the

  • fondant while it's still moist and it will stick and make it look like it is silver.

  • Using a small round piping gently push some indents to make it look like rivets, if you

  • don't have a piping tip then you can use a straw just look through your draw and find

  • anything that is small and round.

  • Then use the back of a knife to make an indent around the goggle.

  • Cut out a rounded groove on opposite sides and that's so that the goggle can fit snuggly

  • onto your minion face and then you want to leave to dry completely.

  • That will take at least a few days.

  • If you are in a hurry then you can add tylose powder to your fondant.

  • That makes it set quicker.

  • The goggles have two little rods that sit where the strap joins to them so make two

  • little round snakes of the same length, indent them by rubbing the back of the knife on them

  • and dust them with silver luster dust and they are done.

  • Next you want to make the gru symbol for the front pocket,to do that cut out a circle and

  • then using a sharp knife cut out a square or diamond shape out of that.

  • Then for the centre roll a small ball of black and squash it into a circle in the middle,

  • put a little cut it so it looks a bit like a pacman and then roll a snake of black fondant

  • and put it going across so it kind of looks like a G.

  • To make your buttons it's pretty simple just roll a ball of black fondant get something

  • that is a flat circle and press it down to flatten the middle, I am just using the back

  • of the paintbrush, again just look in your draw find what you've got, the bottom of pencil,

  • anything like that.

  • Push it into the middle of the button and then get some blue fondant and roll it into

  • a super thin snake and then criss cross it over your button using a skewer to push it

  • in so that it looks like thread going into holes on the button and then leave those to

  • dry.

  • Make some thin black snakes for your hair, curl it over and leave it long at the bottom

  • for poking into the cake.

  • Make more than you think you'll need in case some snap because they are very thin.

  • And leave those on a sheet of baking paper to dry as well.

  • STEP FRAME you need a frame to support your 3D cake.

  • For this minion we are going to use two thick cake boards one 8cm in diameter and one is

  • 15cm the smaller one is for the bottom where the minion tapers down and the 15cm one is

  • for the middle of the cake.

  • Your also going to need two 32cm wooden cake spikes and another four shorter cake spikes.

  • Place your round cake boards in the centre of the wooden cake board and drill two holes

  • through both pieces of cardboard and through the base.

  • The position of the holes is fairly close together becasue they need to be in the place

  • of where the minion legs are so that we can hide them.

  • That gives you a frame like this with your two poles and then your two cake boards you

  • are still need going to need something under that bottom cake board to support the weight

  • of the cake so that it doesn't just slide down.

  • So to do that we are going to drill two more holes one in front and one just behind the

  • ones you've just done.

  • Insert a stick into those holes and use a pencil to mark the height at the base of the

  • board and then measure 3cm higher than that and cut them both to that length.

  • And that allows room for the feet and the legs under that little minion body.

  • If your drill holes are not super tight fitting on those sticks then you are going to need

  • to glue those into place.

  • Put your smaller base board on top and then you are ready for step 4.

  • You need to bake your CAKES Now for 3D cakes they will always take more cake than you think

  • they will.

  • This is a relatively small minion and it took eight cakes.

  • NUMBER FIVE make your FROSTING You need to put frosting over your cake so it has something

  • to stick the fondant to, you can use ganache or here I am using buttercream.

  • All the recipes for the frostings and the cakes are on the website howtocookthat.net

  • To make the buttercream all you so is add softened butter and icing mixture together,

  • mix it with a spoon until it's slightly combined.

  • Then use an electric mixer to whip it up until it's lighter in colour and fluffy, this will

  • take a few minutes.

  • The add a little bit of milk to make the frosting the consistency that you want it you will

  • probably only need about one tablespoon then continue to whip it until it looks pale and

  • fluffy like this.

  • 6.

  • ASSEMBLY put you supports into place and your base cake board, cover it in a thin layer

  • of buttercream and add your first layer of cake, more buttercream and then your next

  • layer of cake.

  • Then I want you to take the last two cake spikes, spike one of them down to the cake

  • board and mark off that level and cut those two sticks to the exact same height.

  • Poke them both into the cake, add your next cake board on top, more buttercream and the

  • next layer of cake.

  • The reason you need this cake board in the centre with the spikes to support it is because

  • when you are stacking a cake this many cakes on top of each other it gets quite heavy and

  • the top cakes are just going to squash the bottom cakes and then your cakes going to

  • go all out of shape.

  • Add your next layer of buttercream and repeat this until you get to the height of your print

  • out or template that you have done.

  • 7.

  • CARVING is carving, now we are making a minion so carvings fairly simple it's domed over

  • the top and domed in at the bottom.

  • 8.

  • CRUMB COAT all that means is a super thin coat of your frosting over the entire cake.

  • And the purpose of this is to capture any of the crumbs in that so that when we do our

  • next coat we are not getting crumbs through it.

  • Once you've done your crumb coat place it int eh fridge and let it firm up.

  • 9.

  • FROSTING Put a layer of frosting over the entire cake using your palette knife to smooth

  • it off as best as you can.

  • Then leave it for about 15 minutes (if it is hot where you live put it in the fridge

  • for that time).

  • Then using some paper towel place it over the buttercream and gently rub it to smooth

  • out any little imperfections.

  • And once you have finished put it back in the fridge

  • 10.

  • DECORATE We have done all of our preparation work and now we are actually going to decorate

  • our cake.

  • Now this little guy has a strap around at eye level so we are going to do our fondant

  • in two sections and use the strap to hide the join.

  • Take a skewer and draw a line roughly where that strap level will be.

  • If you are not sure use the printout that you have made of the minion you are making

  • and use that as a guide to where it is going to be.

  • Roll out the fondant and place it over the top of the cake gently smoothing ti down and

  • then trim it to the level that you drew just before.

  • Then I like to wrap the baking paper around the cake so I know how big to roll out the

  • next piece of fondant, roll it out accordingly.

  • Trim off the top edge nice and straight.

  • Take two balls of yellow fondant and place them just above where the arm level is going

  • to be on the cake because they drop down an bit.

  • Secure them in place with a toothpick (don't worry we will get that out just in just a

  • minute, nobody is going to eat it).

  • Wrap your fondant right around like a coat that's on backwards so that the front of it

  • is all smooth and the join is at the back.

  • Then gently squeeze the arms and pull out the toothpick as you do.

  • Now I should have positioned this arm forward immediately so that they didn't dry out before

  • I wanted to move them so just make sure that you do that just bring them forward and put

  • them in that postition.

  • THen wrap the base of your minion body in the blue jeans colour.

  • Then mold some of your blue colour around each of the support sticks that we have got

  • there to hide those.

  • Roll out some more of your blue and cut it to make the overall shape.

  • If you are not happy just doing it by hand then use the print out that you made as a

  • guide.

  • Cut that out of paper and then cut around that using a knife.

  • Position it onto your cake and smooth it down around the bottom and add some little balls

  • of blue fondant across the back.

  • Shorten your arms to the right length, wrap each hand in a strip of black and push into

  • place.

  • Here you can see because the fondant had started to dry in the other position we've got creases

  • on the arms the and it's not totally smooth that is why I told you to bring it forward.

  • Take another piece of blue fondant shaped just like you did for the back

  • and put in over the top of the hands so that it looks like the hands are int pocket push

  • it around under the front and then smooth it out.

  • Cut two strips of blue and use it to make straps on each side of your overalls going

  • over where the minions shoulders would be if he had shoulders.

  • And secure them into place using a button.

  • If the fondant is not sticking just put a little bit of water on your finger and just

  • put a tiny bit of water just under where you want it to stick.

  • Using the end of a skewer make clothing creases so it looks like the overalls are stretching

  • up to join the button.

  • Add the front pocket with the gru symbol you made earlier.

  • Then use your skewer to make little sewing holes around the edges of the pocket and I

  • made the pocket at the top just stick out a bit so it looked like it actually was a

  • pocket not just something sewn on.

  • Also make a pattern around all the edges of your overalls including the straps and down

  • around where his hands are so it starts to look like fabric rather instead of fondant.

  • To make your shoes simply roll an oval of black, flatten it a bit at the back and position

  • into place.

  • Put your goggle strap around the cake covering the join in the fondant.

  • Use the back of your knife to put a line around the middle of that strap.

  • Next to make the eye take some white fondant and make a domed circle shape using the palm

  • of your hand, then put the pupil that you made before into the centre of that and place

  • it on the cake.

  • Using a piece of cardboard make an indent for your smile.

  • Now it's time for some hair replacement, poke holes in the head and gently poke in the hair.

  • Add a top yellow eyelid and a little bit of yellow to cover the strap up close to the

  • eye on wither side.

  • Use two paper lollipop sticks to support the goggle, poke them right into the cake and

  • then just rest the goggle on top of them.

  • Add each of the little rods that you made earlier to either side of the goggles jsut

  • hwere they join to the strap.

  • You can then put lollies around him and add your candles and your minion is ready to party.

  • [crowd singing - happy birthday] Click on the howtocookthat banner to go to

  • my channel for more dessert cake and chocolate tutorials and thanks to everyone who has subscribed,

  • clicks like and shares the videos really appreciate your support and I'll see you next week.

  • Bye

Welcome to how to cook that I am ann reardon.

字幕と単語

ワンタップで英和辞典検索 単語をクリックすると、意味が表示されます

B1 中級

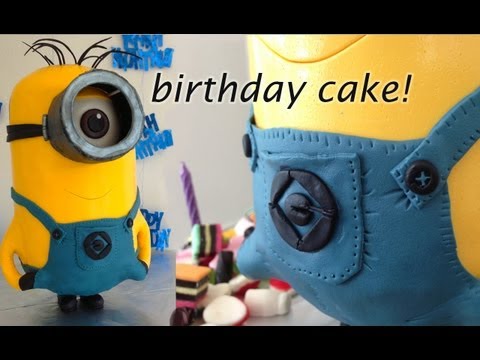
ミニオンケーキ、3Dケーキ by How To Cook That Ann Reardon (MINION CAKE, 3D cake by How To Cook That Ann Reardon)

  • 55 8
    cathy~ に公開 2021 年 01 月 14 日
動画の中の単語