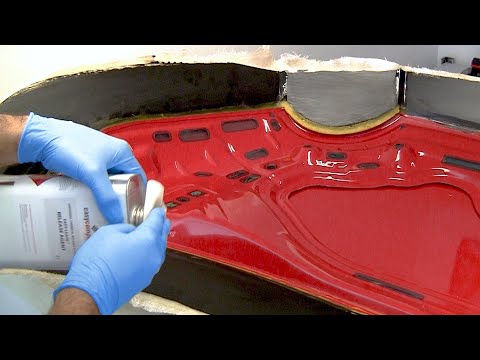
字幕表 動画を再生する
Hello and welcome to this Easy Composites video tutorial. In this series which is probably
the most ambitious we'll ever take on we're going to be answering the question that we
get asked more often than any other, which is how to make you're own carbon fibre vehicle
panels like this car bonnet that you see here. In the tutorial we're going to be showing
you every single step along the way including making the mould, making the parts, bonding
the parts together, trimming and finishing to enable you to make your own incredibly
light, incredibly strong perfectly finished carbon fibre panels. We really hope you enjoy
it. The first step in our process is to take this original steel bonnet which we're using
as our pattern. We're going to add barriers all the way around the outside of it so that
when we make our mould we actually created a mould with a flange on, and that flange
will add stiffness to the mould and it will also give us plenty of opportunity to position
the bagging consumables and things for the resin process. Before we actually apply any
barriers to this part we're just going to take the opportunity to put down a full background
layer of release agent. We're using Easy Lease which is a chemical release agent and of cause
this is what's going to stop the gel coat from sticking to the part but while we've
got the bonnet in this state it's much easier to ensure that we've got everywhere covered
and then we'll probably do another application later on. Making barriers can be tricky. The
technique that we've developed is to use corrugated signboard for the barriers themselves and
the bond those to the underside of the part using hot melt glue. So the first thing to
do is to use masking tape to actually make a template around the edge of the part and
then we'll transfer that onto the signboard and cut the barriers themselves. So with the
masking tape all the way around the edge of the part it's a case of just marking up where
we're actually going to make the barrier pieces in separate sections and we also at the same
time just draw on the angle that we're going to cut the barrier sections at and finally
number them so we can identify them. So we're going to have a cut line here and a cut line
coming off at this angle here. Then this will all be one piece and we'll have cut lines
on the barrier about there. The masking tape comes off the part extremely easily. So we're
just going to start it off and then cut it into the parts that we've identified, being
careful not to rip the tape. So we're transferring this line here onto the board. We know the
angles that we want to make the barriers at. Once we've marked out all these templates
we're just going to cut them out with a sharp knife and then position them around the outside
of the part. we're working on the underside of the bonnet now where we're going to be positioning
this barrier. Now the way we're going to do that is we're going to apply masking tape
to the edge on the underside of the bonnet here and then we're going to be using hot
melt glue on the masking tape and then on the barrier. the reason for the masking tape
is so that this barrier is quite easy to remove when we're done with the process. So we can
get started with that with the masking tape. We've got masking tape all the way along this
top edge so now it's time to use hot melt glue gun we're going to just put a bead of
glue all the way along the top edge and then stick the barrier to it. We've now flipped
this bonnet over just before we do the wax we're actually going to use a release tape
to actually just seal these joins, or a breaker tape and that's just going to prevent again
any of the gel coat from running down into the gap. So we just take the tape and tape
the seam and because it's a release tape the resin and the gel coat won't stick to it.
So the next step is to us a yellow filleting wax to actually create a bead all the way
around the edge between the bonnet onto the flange and what that will do is stops the
gel coat from running under and locking in and also gives us a nice smooth transition
so that when we've got the mould the parts themselves are going to release nicely and
they're not going to get caught up or mechanically locked on this edge. So we've put the filleting
wax all the way around the outside now and you can see from this close up what we want
to do is always be sure that when you put the wax down you've got what's called a draft
angle and that's going to mean that when we remove the part of separate the part and the
mould that there's not going to be a mechanically lock. We're now ready to put the proper coat
of release agent onto the bonnet and we're going to apply two coats of the Easy Lease
all the way over the surface of the panel. Now the filleting wax doesn't requite a release
agent and in fact will actually get dragged off by the release agent if we're not careful
so we're not going to apply any release agent to the wax. We are going to apply the release
agent onto the barrier itself just in case there's any contamination. It is made from
polypropylene so it shouldn't stick but just in case it does we're going to give it a coat
over as well. We've now left this a good half an hour to fully dry off and we're actually
going to apply two coats of wax all the way over the top of this the steel bonnet part.
Now usually we wouldn't use a wax on top of a release agent. A chemical release agent
generally works on its own however in the case of going from a pattern to the mould
itself we want to be absolutely sure that we're not going to have any problems with
the release and so having the chemical release agent and the wax although it's a slightly
unusual combination is going to ensure that we do have no release problems. We're now
buffing off the wax having left it about five or ten minutes and you just really want the
lightest possible pressure when you're doing this just using a micro fibre cloth here and
just skimming over the surface and you can see the shine start to emerge. Right so we've
now left the wax to fully harden off which is roundabout half an hour or something like
that and so it's actually time to make the mould itself. So we're going to be using a
very versatile tooling system called Uni-Mould and the Uni-Mould system comprises a tooling
gel coat which is a vinylester tooling coat. Now the reason we're using vinylester is that
that's actually compatible with polyester resin, vinylester resin but most importantly
for us epoxy resin and it will guarantee an excellent release of the parts out of the
mould which you wouldn't get with a normal polyester gel coat. The Uni-Mould system then
uses a coupling coat which is reinforced coupling coat we actually add a lightweight chopped
strand mat in with that which forms the connection between the tooling gel and then the tooling
resin itself. Applying the gel coat now we can do this in either two thin coats or one
thicker coat. We'd be targeting in a single thick coat of a roundabout 0.8 mm. Now for
a bonnet this size we're looking at mixing up a roundabout 700 grams of gel coat if you
mix up too little and you come up short you can always mix up some more. We're using normal
MEKP catalyst and a ratio of about 1.5 to 2 percent. So for 700 grams of the gel coat
that would obviously be 14 grams at 2 percent of the catalyst. Applying the gel coat is
totally straightforward covering it and we're going for that approximately 1 mm which is
a reasonably thick application. We've now allowed this gel coat to cure to the right
point. It's certainly very much firmed up but it's still got a very slight level of
tack which is the right point for a gel coat. So in the Un-Mould system it's now time to
add the coupling coat. As we say we've got a light chopped strand mat, we're using a
225 gram here. This is really as heavy as you would want to go at the coupling coat
stage, you could go lighter and we're going to be wetting this through with the coupling
coat. Again this is catalysed at a ratio of about 1.5 to 2 percent we're going to be catalysing
it about 2 percent and we're going to use a full kilo on this layer. When the coupling
coat has been fully catalysed it does actually change to a darker colour so you can tell
it's ready to go. Now when you're working with he coupling coat it's just like any chopped
strand laminating so you apply the resin to the part first and then drop the glass mat
down onto the resin and then wet it through from above. The light chopped strand provides
reinforcement at this early stage but because its a light mat it's very easy to get it down
into the contours of a mould which ensures that you're not going to have any voids between
the gel coat and the main tooling reinforcement and the coupling coat itself chemically is
designed to act as an interface between this vinylester tooling gel coat and the tooling
resin itself. We've now allowed this coupling coat to cure in our case its taken around
three hours and it's very much firm to the touch but it got a slight tack and that's
the right point for us to go on with the main reinforcement. Now because we're using the
Uni-Mould tooling system we're going to be putting down all of the reinforcement and
the resin in one hit. The Uni-Mould tooling resin is a filled resin system so it's very
important to thoroughly mix up the contents and we'll also give it a quick stir to make
sure that any sediment or fillers are thoroughly mixed in to the resin. With the resin catalysed
at between 1 and 2 percent, we've used 2 percent because it's only a small mould we're then
going to apply the resin all the way over the surface and start building up this chopped
strand mat. So we want to work reasonably quickly and get it all down in one hit. We've
now allowed this to cure fully overnight as you can see the colour of the mould has changed
to a lighter shade indicating that the exotherm has taken place and so we're going to turn
the mould over and without removing the bonnet we're going to look at making the moulding
for the inner skin. Okay so we're now going to remove the temporary barriers that we put
in place. And you can see the why we signboard its released perfectly from the tooling gel
coat. we're going to be using the flange from the upper mould as the flange for the lower
mould and so what we're going to do is leave most of this filleting wax in place but we're
just going to ensure that it's nice and smooth so that its acts again as a fillet between
the flange and the inner mould that we're going to make. So we're looking at the underside
of the bonnet now. We've got lots of holes as you can see that have been cut out, die
stamped out of this inner skin we need to blank all of these of which we'll be using
release tape for and we've also got these studs here that were for the hinge mechanism
and the latch at the front. Now because we're happy to sacrifice the bonnet in this case
we're going to grind these off and again grind the latch mechanism off. If you didn't want
to sacrifice the bonnet and you want to keep it useable then you could blank these off
using plasticize or something similar and then make the mould around them but for simplicity
we're just going to grind them off. So applying the release tape to mask off these holes on
the underside of the bonnet. We just pull the tape tight over the hole and press it
down firmly. So where we've ground off this latch mechanism we're going to tape all the
way over this using the release tape. And the tape should be sufficiently strong that
we won't need any other reinforcement over that area. So we're applying the Easy Lease
chemical release agent all the way over the surface of the inside of this part and very
importantly this time round on the flanges as well. We'll be applying two applications
of the chemical release agent and then we'll be following up with two coats of wax making
sure on this occasion that we thoroughly wax the flange. Where you can see the upper moulding
meeting the lower moulding and we've got this gap here we need to thoroughly fill that with
the wax fillet to prevent the tooling coat from running under there and sticking. So
we just put in a large bead of wax and then smooth it out in just the way we've been doing
elsewhere. So if we just take a quick tour now of what we've done before we put the gel
coat on. We've got release tape over all of the catch mechanisms we've got any interior
holes we've filled with release tape and again we've cut those to be nice and neat. On these
areas where we've got a bit of undercut on the actual steel of the bonnet we've completely
filled that with filleting wax as we did with this awkward corner. And you can also see
how we finished that middle edge. Okay so we've just mixed up a new batch of the tooling
gel coat and we're just going to apply this all the way over the surface of the inside
of this mould just like we did on the top mould. Again we're going for that target 0.8
mm thickness which is a reasonably thick brush application. now that the gel has cured we're
just going to put down another coupling coat exactly as we did before. here again we're
using the 225 gram glass but another excellent option for the coupling coat is something
even lighter like a couple of layers of an 80 gram. So the coupling coat has no cured
of and it's time for the main reinforcement again. Just like before we'll be applying
all of the reinforcement and the tooling resin in one session. We'll be using four layers
of the 450 gram chopped strand mat. So that's the underside of this mould finished so we'll
allow this to cure fully overnight and then tomorrow we'll be trimming these and separating
them. This mould has fully cured now so we've marked up a trim line all the way round the
edge equally spaced to where we know the bonnet comes to. And so now we're going to trim them
apart to separate them. We're going to be using a jigsaw cutter to trim the two moulds
and we're using a permagrit blade which is a tungsten carbide blade in the jigsaw. With
the mould fully trimmed it's now time to some extent for the moment of truth and what we're
going to do is separate the upper and lowers moulds. So to do it we're going to be using
a chisel and trying to insert it between the two layers of gel coat and then just tapping
that in with a hammer, I think we can hear the moulds releasing. So we're just going
to insert lollypop sticks now. That's sounding good. So that's our upper bonnet moulding
done now and it's just time to remove the bonnet itself from this lower tool. We'll
be looking at doing this underside moulding first because it's actually slightly more
complicated than the upper moulding. So the first things that we'll do are pretty self
explanatory we'll strip off any of the filleting wax that's on the underside of the moulding.
We'll also be looking at taking off any of the release tape. And finally if there's any
blemishes such as this one here then we'll just be filling some gel into those areas.
You'll fine that a chemical mould cleaner like this will quickly and easily strip off
the filleting wax and any other contamination from the mould surface. So this area that
you can see here, I think the paint actually wrinkled up on the underside of the bonnet
and it's left this blemish here so what we're going to do is chisel out all of the paint
and some of the gel coat so that we've got some fresh material and then we're going to
put some new tooling gel coat into this blemished area and sand it smooth. So to make a repair
like this what we do is we mix up just a small amount of the Uni-Mould tooling gel coat a
few drops of wax additive and the wax additive prevents the gel coat from staying tacky on
the surface where it comes into contact with air like a gel coat would normally do. Once
the gel coat has hardened up and you can see that the wax additive that we included has
meant that there's no tackiness here then we can start wet sanding and flatting. So
we've flatted this out nicely now using the wet and dry paper, we're just finishing it
off with a 1200 grit before we go on and use polishing compound which we can either apply
by hand or as we're going to do using a polishing wheel. Although both of these tools are now
pretty much ready to use as they are to give this a real professional finish what we're
going to do on this top mould is give this a wet flat all over with a 1200 grit and then
we're going to polish it all over using an intermediate polishing compound like this
Mirka T10. The reason for wanting to give it that flat on the surface is if you just
catch the reflection here of the light you can just see a very very slightly texture
to the surface and that's partly print through from the chopped strand mat underneath and
other just surface imperfections on the original bonnet. We've now polished both of these moulds
up to a high standard and so that actually concludes the fist part in this video series.
In the next instalment we're going to be looking at using both of these moulds to produce the
parts themselves using the resin infusion process. I really hope that you've enjoyed
this video. For more information or to purchase any of the products that we've used in this
video please visit our website easycomposites.co.uk.