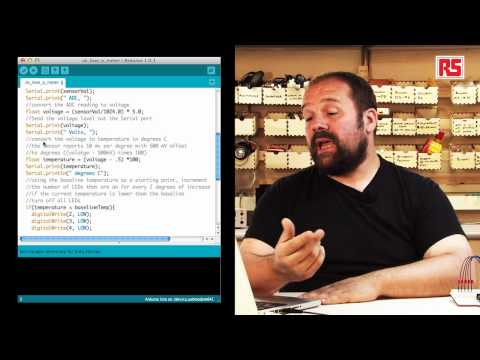
字幕表 動画を再生する
Hi and welcome
to another video about
our Arduino StaterKit
This is called the LOVE-O-METER.
This project is used to measure
how hot you really are.
Actually
in simple words
this circuit
is a very simple thermometer
that measures the
your body temperature
and visualizes it
on a string of LEDs.
So
let's look at how this circuit is built.
There are 5 LEDs on this circuit
that are used as an output.
So you can visualize the
temperature by looking
the number of LEDs that are
on at the given time
and so this is an extension to the
previous project we looked at
when we used three LEDs
and now we learn how to use more LEDs
so we go up to five.
But the most important part
about this circuit
is actually the sensor.
In this particular circuit, we use
a temperature sensor
called TMP36.
And
the interesting feature about this
sensor is that it's a very precise
temperature sensor that
generates a voltage
which is proportional
to the tempertature that it measures.
In particular this sensor generates
10mV of voltage
for every degree centigrade
plus 0.5 volts.
So for example, if the temperature
in this room is 20 degrees,
then 20 multiply by 10mV
is 0.2V
plus
0.5V, which is the
basic voltage that is always produced
at 0 degree.
by the sensor.
So when the temperature in this room is
20 degrees, the sensor will produce
0.7V.
Now we hit an interesting problem.
In this particular case
we will use a pin
that is able to measure if
the signal was on or off.
It was able to measure
if there was or there wasn't
any voltage applied
to the input pin.
in this particular case, the sensor is
producing a voltage, which changes
depending on the temperature.
So if we want to actually be able
to measure the temperature,
we need to be able to measure
the voltage produced by the sensor.
So, the digital pin
doesn't work here
because the digital pin
says if the voltage is more
or less than 3V,
to determine if the input is HIGH or LOW.
If the voltage is more or less than
0 then the input is low.
We need something
that is going to be able to
give us a number,
which is proportional to the voltage
that is measuring.
Here we introduce the
analog inputs on the Arduino board.
You can see here
that there are six inputs.
on our circuit
called analog Pin.
Each one of them is able to measure
a voltage between 0 and 5V,
and it will return a number between 0
and 1023,
proportional to the voltage
it's measuring. So, when the
voltage is 0,
the number returned by the analog
inputs is going to be 0.
When the voltage is 5,
the number is going to be 1023.
For example for 2.5V,
the number returned by the
input is going to be roughly 512.
So, what we are doing here..
we wired up the sensor
in such a way that we are providing power
and connect to ground,
so we are powering the sensor.
And then the sensor has a third
leg that we connect
to analog input 0.
So whenever the temperature changes,
the voltage changes.
The Arduino uses a new instruction
that we are going to see in the code
later on called analogRead().
That will give us a number that we
can use to caculate the
actual temperature.
Let's try the circut for a second.
I am going to grab the
temperature sensor and see what happens.
So you can see now,
that the LEDs
are turning on
one after the other
when I touch the sensor.
And if I release the sensor now
The temperature is going to
slowly go back down.
And you will see the LEDs
start to turn off
one after the other.
So once we see the circuit is working,
we should be looking at the code,
and understand how we have
implemented this functionality.
So let's have a look at the code
for this example.
So if we look at the code,
you see some familiar
elements like the setup() function.
So let's start at the beginning.
We define a constant
called sensorPin that maps
the analog input 0, A0.
In the code here you can see A0.
And this one
allows us to
be able to change the input
pin if we want to.
And it gives a meaningful name
to that particular input.
So we know that the
temperature sensor is connected there.
So the code becomes more readable.
Then in the setup() function,
the first thing that you see
is that we are using serial.begin(9600).
This is a new function
that we have introduced
in this example.
It allows the Arduino board
to communicate with your computer.
So serial.begin() opens a
communication channel between your
Arduino board and the computer.
9600 specifies the speed,
9600 bits per second.
So this allows us for example
to print numbers
that we can read from the analog inputs
and send to the computer,
where we can use the serial monitor
that I will show you in a few seconds
to visualize the data
that comes from the Arduino.
Then we find the "for" loop.
The for loop is useful
in order to
execute a certain number of
instructions for a very well
defined number of times.
In this particular case
we need to set 5
pins on the Arduino
to become outputs,
and then we need to turn them off.
So instead of writing the same
two lines of code for five times,
we use "for".
If we look at the code,
We say that "for" starts
with x=2.
Then every time that we execute
pinMode() and digitalWrite()
x increases by 1.
x++ is the instruction
that increases the value of x by 1.
And we keep doing this until
x is less than 5.
So when we hit pin5, we stop
doing this loop.
So, this is very useful.
If you have to apply the same operation
to a number of pins.
So let's delve into the loop.
Inside the loop
We are reading the sensor value
using analogRead(), so we have
sensorVal = analogRead(sensorPin).
This will measure the voltage and return
an interger number
which is proportional to the voltage
that has been read.
Serial.print()
prints the number towards the computer.
serial.print('ADC')
specifies the number that
we just sent to the computer
1s a raw value
from the analog to digital converter.
The analog to digital converter
is the circuit
inside the Arduino processor
that turns a voltage into a number
that we can use in our code.
The next operation
turns the number read
by the analog to digital converter
into the actual voltage.
So we specified
that the numbers between 0 and 1023
represent the voltage between 0 and 5V.
What we are doing here is
dividing sensorVal by 1024,
which is the number of possible values
that are representable by analogRead()
and we multiply that by 5.
This float variable
is a new type of
variable that we are introducing
with this example.
It is able to store decimal numbers
as, in this case
is needed
because we are going to get
voltages like 0.7, 0.8,
and we need to be able to
represent this kind of numbers.
Then, we follow up with
Serial.print(voltage)
and Serial.print("volts").
This
again sends to the computer
the voltage computed by the
Arduino and
the string "volts", to specify
that the previous number was
the amount of voltage.
Now, here is where we actually perform
the calculation of the degrees.
The sensor, as we said,
is producing 10mV
per degree centigrade
and then adds 0.5V
to all values.
So, if we look at the code,
we are taking the voltage,
we subtract 0.5V,
and we multiply it by 100.
Using this formula we convert
the voltage measured by the Arduino
into the actual temperature
in degrees centigrades.
Then we print the temperature.
And then we use a new function
called println() to write
the string "degrees C".
println() on top of sending the
information back to the computer
sends this new line
special character that tells
the serial monitor on the Arduino
to start printing the next line
at the beginning of a new line.
This makes sure that all
the value that we visualized
are all nicely
aligned and readable.
Finally
once we have the temperature,
we need to be able to decide how many
LEDs are turned on and off
depending on each temperature.
So what are we are going to do?
Actually, we are going to use a series
of "if"s.
In the previous example, we use
"if..else" to
be able to decide
when to execute one part of the
code or another part of the code
depending on the result
of a question, a kind of
condition that we ask Arduino
to verify.
In this particular case,
we have to verify multiple questions,
because we have five LEDs.
Therefore we have multiple combinations.
So we use a different kind of "if"
notion called "else..if"
So we ask Arduino
is the temperature less than the
baseline temperature?
If that's true, Arduino is going to
turn off all the LEDs.
If the temperature is in the
first band, we have an "if"
that's measuring if the temperature
is more on the certain value
but still less than another value.
If the temperature is within that band,
one LED will be turned on.
And then we have a set of "else..if"
that goes through every
combination of the values until we
are able to turn on all of the LEDs.
So in this particular code that we are
displaying here, we are
using "if..else"
"else..if" to divide
the temperature range
that we want to measure
into bands.
And we check to see in which band
the temperature falls in.
And we decide which LEDs to turn on
and which LEDs to turn off.
Then
through the last "else..if",
we reach
the end of the program.
Then the loop is going to start again.
We are going to go
through the same sequence,
measure the temperature
through analogRead(),
take the number, turn it into a voltage,
then from the voltage
compute the temperature,
print all that information
onto the screen and then afterwards
decide which LEDs
to turn on depending on the temperature.
If now I grab the sensor
the temperature increases and
the "if" statements are deciding
which LEDs
- for example, at this moment these LEDs -
are flickering, because
the temperature is between two bands.
So it's still undecided which
one should be turned on.
If I release this,
and maybe I
blow a little on the circuit,
you will see these LEDs will
start to flicker a little bit.
and then turn off.
So, we have now reached the end
of this example.
We have learned a little bit more.
We have learned about
controlling multiple LEDs.
We learned about reading analog inputs,
converting the values into voltages,
converting the values into temperature,
using multiple "if" statements
to divide the value into the bands,
and make multiple decisions.
And then how to print
all this information
back to the computer.
I hope you will enjoy
playing with this project and
I'll see you in the next video.