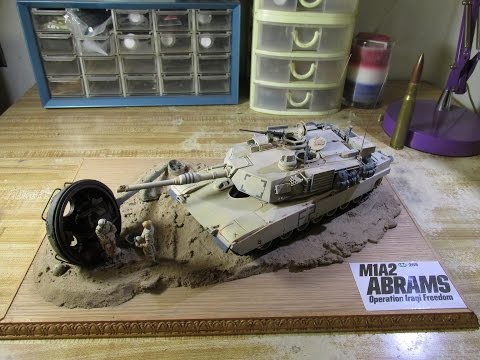
字幕表 動画を再生する
Hi, I'm QDC. What we're about to build today is Tamiya M1A2 Abrams Operation Iraqi Freedom.
This is part two of my video series called "Direct Hit" in which I'm going to marry this
particular kit from Tamiya with this particular kit from Verlinden Productions..."Bullseye"
model kit. So lets go ahead and start building this particular kit right now.
Lets take a look inside this box. We have the tracks. The turret. A figure. Mesh. Upper
hull. Accessories. Lower hull. Wheels. Gun barrel. Decal. And instruction sheet.
I want to talk to you more about a cost cutting measure that Tamiya has done for this model
kit. In order for them to make this kit more affordable, what they done was they created
a shortcut in terms of making two parts. What you see right here is a fabric mesh and what
you see right here is piece of plastic. What they want you to do is using the fabric mesh
they want you to make a wire mesh for the back of the turret and they have given you
a picture of the actual size and you are suppose to put this on top of the picture and use
a pair of scissors to cut out the size for that wire mesh. Right over here on number
sixteen is the instructions for making the combat identification plate and you are supposed
to use this piece of plastic. Right here were I'm pointing at is the dimensions for that
particular plate and I'm using a digital caliper to measure the dimensions that they given
and I found out that the dimensions are exactly the same as the picture on number sixteen
so it makes it a little easier. And again, this is a Tamiya's way of trying to be more cost effective.
Ok, so we built the model kit and now it's
time to show you what I think about this kit so far. Take a look.
This is the completed mode kit before painting and this is a very straight-forward model
kit to build. I like the tracks and the wheels and the accessories. When you build this model
kit it's not going to be hard. The only hardest part about building this model kit will be
making the combat identification panel right here and right here. I highly recommend this
model kit for all skill levels. It's time for me to paint the model.
It's time for me to paint the model. I already gave the model a coat of black primer and
now it's time for me to use my airbrush and paint the entire model with the base color.
I'm going to protect my entire model by giving a coat of Future Floor Wax.
I'm going to give my model a wash. What you see right here is a dilution of light brown
artist oil paint and mineral spirits and what I'm going to is I'm going give the entire model a wash.
I'm going to give some dust effects. I'm going
to give the entire model a coat of very light tan, almost a white color.
This is the completed mode kit after painting and weathering and this is a nice kit. Tamiya
as most of the model kits that I made from them are very nice. Easy to build and it's
highly detailed. I like the turret with all the details including the backpacks and the
wheels and the tracks look very nice. I can't say anything honestly bad about this particular
kit and Tamiya is just a very good company. I really like them a lot. It's time for me to build the diorama.
It's time for me to build the diorama. What
you see right here is the base and I built the base myself. This is made out of plywood
and right over here are the moldings that I purchased at my local hardware store and
simply glued and nailed on. This is from part one of the video series from Verlinden Productions
and right over here is a piece of foam-board. I put he foam-board over here because I want
my ground material which is made out of pre-mixed tile grout to dry faster.
I'm going to add the pre-mixed tile grout and afterwards I'm going to sprinkle on some
powered tile grout.
Ok, so we built the model kit. We painted it, we weathered it, and we even made a diorama out of it and now it's time for me to show
you the entire model project from the beginning to the end. Take a look.
This is the completed model diorama after finishing everything and I have to admit this
to you. I didn't think that this diorama would look this good as it is right now. I didn't
have high expectations that the Verlinden Productions kit would work well with the Tamiya
kit but I was wrong as you can well see. I like the way I blended the two kits together
with the nice ground material and the tank looks very nice and realistic. I really like this diorama a lot.
That completes this model prodject. What you're
about to see next is a video slideshow of the entire model diorama but before I go,
as always, just because I put this video here on Youtube, it doesn't make me a model kit
expert. I am not an expert. I'm just a regular guy just like you. I hope this video encourages
you to build a model kit of your own either it's a model tank, a model plane, a model
train, or even an automobile. It doesn't matter. In the end, it's all about have fun. I'm QDC.
Thanks for watching and always please. Have a great day!