Placeholder Image

字幕表 動画を再生する

  • Hello and welcome to the next instalment in this video tutorial series. In this instalment

  • we're going to be actually making the carbon fibre bonnet itself and we're going to be

  • showing you the latest techniques for making a medium sized carbon fibre panel like this

  • and obviously we're using the mould that we made earlier in the series. The first thing

  • that we've done is prepare the surface of this mould using several application of Easy

  • Lease chemical release agent which we've done as per the instructions for that product and

  • now the next thing that we're going to do is an optional step but we're actually going

  • to spray the surface of this mould using a very special epoxy compatible polyester gel

  • coat. Now it's very important at this point that we make it very clear that the GC50 epoxy

  • compatible polyester gel that we're spraying here is not the same as a normal polyester

  • gel coat. Please don't try and use a normal polyester gel with epoxy because it just simply

  • will not bond and will immediately delaminate. However one thing it does have in common with

  • a normal polyester gel is the fact that we catalyse it with a regular MEKP catalyst.

  • We've mixed the gel up in one of the paper cups that's designed for the cup gun so it's

  • a case of just putting that cup into the holder and then pressing the lid firmly on and then

  • we load this into the gun by pulling the spring to hold the cup in place. Our gel coat spraying

  • cup gun is equipped with a 6ml nozzle which when you're spray a material a viscous as

  • a gel coat is the ideal choice. And we're just going to try and gel a smooth even coat

  • over the surface starting and finishing off the edge of the part to avoid getting any

  • drips on the mould. We've now allowed this gel coat to cure fully overnight. Now unlike

  • a conventional polyester gel coat when this cures it cures with a hard finish and no tack

  • at all and that leaves the perfect bonding finish for the epoxy resin. The first thing

  • that we're going to do is just wipe around that perimeter of the mould, clearing any

  • overspray off this flange and that's so we've got a nice clean surface to stick the bagging

  • tape onto. We're going to apply the bagging tape all the way around the perimeter of the

  • mould at this point for convenience really before we put down the bagging consumables

  • itself. The only other thing that we're going to do before we start is we're just going

  • to look for any high spots like this on the mould surface which have been caused by a

  • drip off the gel coat gun and we're just going to flatten those off and that will stop any

  • of those printing through onto the surface of the reinforcement. We're going for a laminate

  • of 200 gram carbon, 2mm Lantor Soric and then 2000 gram carbon. Visually of course the first

  • layer is the most important so we're just being careful to gently drape this 2.2 twill

  • into the mould. Often what you want to do is get the carbon to just stick slightly in

  • position and so what we do is just sprintz a very small amount of acetone onto the carbon

  • and what that does it just slightly activates the gel coat surface and it means that you

  • can stick the carbon down onto it. And once we've done that we just use a pair of shears

  • to cut off the excess material we've only got to be just inside of the tape line. And

  • now this is the Lantor Soric which is an infusion core material and we've cut this just which

  • a pair of scissors about 25mm short of the edge of the bonnet all the way around and

  • that's just because we don't want the core material exposed at the edge of the panel.

  • In this close up you can really see and get a good idea of how the Soric core material

  • feels and behaves. it's very easy to cut and lay into the mould and then we've got this

  • fine honeycomb structure around which the resin can flow as an internal core media.

  • Next we're using some special infusion grade spray tack and just spraying that lightly

  • over the surface of the reinforcement and then using that to help us position the Soric

  • squarely and evenly in the middle of the mould which is quite important for us because we

  • want to maintain an even gap all the way around the edge where the core material ends because

  • into that we're going to be layering some 200 gram carbon tape. We're using a 50mm tape

  • here again the infusion spray tack is particularly helpful to allow us to fix that in place and

  • position it very accurately up against the edge of the soric we certainly don't want

  • a gap at this point. We're going to build up 6 layers of the carbon tape so that we've

  • got a match for the thickness of the Soric. So you can see we've got this tape nice and

  • neatly butted up against the Soric so we're just going to add our next layer, final layer

  • of 200 gram carbon cloth all the way over the surface and then we're just going to trim

  • this just like we did before. So over the top of this second layer of reinforcement

  • we're just positioning a layer of peel ply and we're just going hold this in place with

  • a few pieces of the release breaker tape. The next thing that we want to be thinking

  • about is the infusion mesh in the spiral. So we're going to position infusion mesh along

  • the front here because we're going to be running the resin the shortest distance which is from

  • the back of the bonnet to the front of the bonnet and then we'll also be positioning

  • another strip of the infusion mesh just at this front edge and that's going to help spread

  • the vacuum. We're positioning this infusion spiral all the way around this back edge and

  • just holding it in place with some of the release breaker. So the final thing to do

  • before we bag this up is to position the resin infusion silicone connectors. We've got one

  • at the back here which is the resin feed line so that sits on top of the spiral. And then

  • we've got one opposite on the front end of the bonnet which sits on this mesh and this

  • is the vacuum line so we're just going to tape that in place to stop it moving down

  • and just pierce through. We've added some gum tape pleats around the outside of the

  • mould and so we're just sealing this bag down to the tape. Now we've got an alternative

  • video dedicated to the vacuum bagging process so we're not going to go cover it in much

  • detail here but if I just go over what we've got. We've got the vacuum bag completely sealed

  • to the tool all the way around we've got our pleats in place ensuring that we've got plenty

  • of bag, plenty of slack on the bag. At the top of the bonnet here we've got the vacuum

  • line connected to the catch pot and the catch pot connected to the composites vacuum pump.

  • And then where we've got the resin feed line at the back of the bonnet this is just clamped

  • off so what we're going to do is just switch the vacuum pump on and pull a vacuum on this.

  • Finally before we an infuse we're just going to clamp off this bag and do a vacuum drop

  • test which is absolutely essential before we can do the infusion. We've come back to

  • this part now a couple of hours later and we've performed the vacuum drop test and that's

  • shown us that there has been absolutely no pressure drop in this bag whatsoever and so

  • that's the point where we can continue. When you're calculating the amount of resin that

  • an infusion project is going to use of course you do need to make sure that you allow for

  • the Soric and also the vacuum bagging consumables we've actually got a handy calculator on the

  • Easy Composites website that will allow you to do this. Now you'll see us do this again

  • later but what we're doing here is just mixing a 50/50 blend of the fast and the slow hardener

  • which are available for the IN2 infusion resin. And the reason we do that is this gives us

  • a medium speed hardener which is perfect for an infusion of this size. it's very important

  • to thoroughly mix the resin with its hardener trying to do so without aerating the resin

  • while we do it but any unmixed resin will fail cure in the part. So we've allowed the

  • resin just to degas just for a few minutes to get any large air bubbles out so what we're

  • going to do is release the clamp from the vacuum line from when we did the drop test.

  • We're going to turn on the vacuum pump open the vacuum pump supply and then we're just

  • going to draw the first amount of resin up to this clamp just to remove any air that

  • it's at this point. We're just using on of the spare clamps to hold the line on the side

  • of the resin container and then we just gently unclamp the resin line into the part. You

  • can see how quickly the resin follows the line of the feed spiral giving it a very even

  • advance across the part. So you can see how effective the soric is as internal flow media

  • because this line here of the resin advancing through the part is not being hindered by

  • the fact that the infusion mesh it actually stopped at this point and this is still, progressing

  • through the laminate nicely. As you can see the resin has now reached the silicone connector

  • on the other side of the part and the resin is actually starting to be drawn down the

  • vacuum line so what we're going to do is just let this carry on being drawn just for a couple

  • of minutes and that's actually extracting some of this aerated resin and then we're

  • going to clamp off the resin line. With both of these lines clamped of now we're okay to

  • turn off the vacuum pump and we're going to leave this part to fully cure. Now the hardener

  • speed that we've chosen and the ambient temperature that's going to take about 24 hours. With

  • this part now completely cured off you can here the resin is absolutely solid it's now

  • time to remove all of the bagging consumables from the mould so we're now going to start

  • with the bag itself. Just removing the peel ply from the back of this laminate has actually

  • started to pre release it from the mould already so we know we're not going to have any trouble

  • releasing it and that really is the sign of a good chemical release agent. So we're just

  • going to get in and tease it up and it's out of the mould already. With this part out of

  • the mould you can really see all of this hard work has paid off. We've got a fantastic mirror

  • gloss over the surface of the bonnet from that clear gel coat we've used. There's no

  • pinholes whatsoever, there's no bubbles, there's no air inclusions so you've got to be pretty

  • pleased with that at this stage. Moving on now to the inner skin moulding we're actually

  • going to be using just two layers of reinforcement on this which is going to be a 200 gram and

  • a 600 gram because we want this to be as light as possible, although we're going to have

  • additional reinforcement in the critical areas, which is where the hinges are and also the

  • catch mechanism at the top. This mould has been prepared with several application of

  • Easy-Lease chemical release agent just like we've done in previous sections and so we'll

  • just be laying the reinforcement directly onto that. So the 200 gram cloth is the first

  • one down onto the mould because obviously this has the flatter finish. We're going to

  • use some spray tack just on the surface of the mould and this will help us to position

  • the carbon now it will leave slight imperfections on the surface of the part but that doesn't

  • matter for the underside moulding that we're working on here. The next step is to put our

  • second layer of reinforcement down. So in this case we're using the 660 gram cloth.

  • Now the reason for doing that is that this will actually give us about 0.6 nearly 0.7

  • mm thickness of reinforcement but we can do it in a single layer which is not only quicker

  • to put down but it's also considerably cheaper than three or more layers of a 200 gram cloth.

  • Another light application of the spray tack will just help to position this heavier 660

  • gram cloth. With both layers of reinforcement down now we're just going to trim away the

  • excess reinforcement. With all of our reinforcement in place we'll just now go on with a standard

  • infusion vacuum bagging stack which will be peel ply, then the mesh and then the bag itself.

  • We're just going to cut the mesh approximately to the right size and then we're just going

  • to hold it loosely in place and we're just going to take some of the vacuum bagging tape

  • all the way around the edge of the flange. As before we're just going to add a few pleats

  • made out of the bagging tape and position these around the edges. The next thing we've

  • done is position the infusion spiral around the edge and we've also gone down the sides

  • as well in exactly the same pattern that we did for the top skin. So we're just going

  • to position the infusion silicone connector on top of the spiral here and then we've got

  • the other infusion connector ready to go at the front and so on now with the bagging film

  • itself which we're going to tape down onto these pleats. So we're going to switch on

  • the vacuum pump start to pull the bag down and position the bag as it goes down. Now

  • clearly we've sped up time quite a bit in this shot but this really is a very important

  • part of the resin infusion process and for that reason if you want to learn more about

  • how to get the bag down properly then please check our resin infusion video and our video

  • dedicated to vacuum bagging. We've completed the drop test now on this bag so we're 100

  • percent confident now that there's no leak whatsoever so it's now time to do the infusion

  • itself. So as before we're going to be using an epoxy infusion resin and for this infusion

  • because it's going to be taking place relatively quickly a combination of the fast and the

  • slow hardener together. With the resin thoroughly mixed now and settled it's time to start the

  • infusion. Start the vacuum. As you can see the resin has now reached the other side of

  • the infusion project so it's time to clamp off the feed line and we can now clamp off

  • the resin line. So we can now turn off the vacuum pump and leave this to cure overnight

  • or as long as it takes depending on the hardness speed that we've used. We've now left this

  • part to fully cure so now it's time to strip off all of the vacuum bagging consumables

  • just like normal. with everything stripped off now we'll just remove the part from the

  • mould. And that is our inner moulding. Now that we've got the mould out of the way we

  • can have a nice look at this part itself. It really is incredibly strong and light and

  • all of the detail that we've got on the underside of the moulding of course has been faithfully

  • reproduced in this inner skin so this is going to make a fantastic inside for our bonnet.

  • We've now made both the outside skin and the inside skin for our carbon fibre and so that

  • concludes this part of the video tutorial. In the final part we'll be looking at trimming

  • both of these components, fixing the fittings inside and then bonding them together and

  • finishing it to complete the part.

Hello and welcome to the next instalment in this video tutorial series. In this instalment

字幕と単語

ワンタップで英和辞典検索 単語をクリックすると、意味が表示されます

B2 中上級

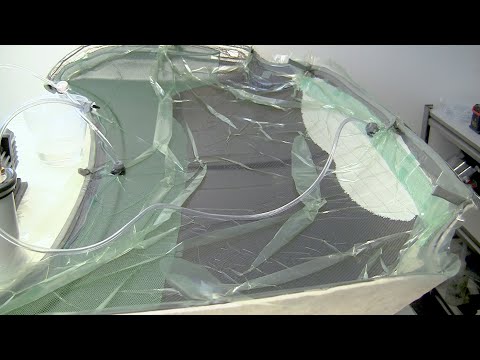
カーボンファイバーカーボンネット/フードの作り方 - パート2/3 (How to Make a Carbon Fiber Car Bonnet/Hood - Part 2/3)

  • 38 6
    鄭富仁 に公開 2021 年 01 月 14 日
動画の中の単語