Placeholder Image

字幕表 動画を再生する

  • Last time we learned a whole bunch of anatomy about the pelvis, and how a bucket can help

  • us draw the simple forms. Now let's take it a step further and put a pelvis in that bucket.

  • If you haven't seen the previous episode about the anatomy of the pelvis, you might get confused.

  • This method of constructing the pelvis from nothing is most useful when you are drawing

  • from imagination. That's really the goal of this whole course - to set you up to be able

  • to draw the anatomy of the body from the vision in your mind. You'll be able to construct

  • the forms starting with the skeleton and build the muscles over that. Premium students, you

  • can start your first few drawings using the 3d model, but then try to do some from your

  • imagination. You want to get this construction down well enough that you can do it in your

  • sleep.

  • Ok, so let's get started.

  • Step 1 - The Bucket

  • I'm imagining a 3/4 front view, pointing to our right. It's not tilted up or down. It's

  • in it's neutral anatomical position. Remember, a neutral pelvis simplifies to a bucket that

  • tilts forward. But that doesn't mean the person is actually tilting their pelvis forward from

  • neutral. This is not neutral. This is neutral.

  • Let's start with the ellipse of the top cap - the lid of the bucket. The roundness of

  • the ellipse will be based on how much of the top plane we are seeing. The angle of the

  • ellipse will depend on the long axis of the bucket. The long axis is the line from the

  • center of the top to the center of the bottom plane. The angle of the ellipse on a perfectly

  • round bucket is perpendicular to that long axis.

  • Now find the sides of the bucket. Make sure you follow the original angle of the long

  • axis.

  • Finally cap off the bottom of the bucket.

  • Step 2 - Cut out a Wedge

  • After establishing the simple bucket, we need to cut out this wedge shape from the front

  • top half of the bucket. The edges of the wedge align with some of the landmarks, so the placement

  • is not ambiguous. I like to find some more construction lines to get the placement of

  • the wedge precise.

  • I'll start by gridding out the top plane. Put a dot in the center of the top plane.

  • Find an angle from side to side. In our case it's horizontal. In some cases, when the pelvis

  • is tilted or when the horizon is above or below the pelvis, this angle will not be horizontal.

  • Then find an angle from back to front. I like to continue these lines all around the bucket

  • as if they are rubber bands. Even ghost them in the back planes a bit lighter.

  • Ok, so now these lines will help us take out the wedge. The top corners are the ASIS points.

  • That edge between the ASIS points is ? of the way down from the center to the front.

  • Put a line parallel to the horizontal line and now we have the ASIS landmarks.

  • The pubic symphysis is halfway down the front plane. From there, wrap a rubber band around

  • the bucket.

  • Drop vertical lines from the ASIS points to that rubber band. Connect these two corners,

  • and there you go. You've cut out the wedge.

  • I'm going to find one more construction line before I move on to the next step of drawing

  • the actual forms of the pelvis. Similar to this front edge of the iliac crest, I want

  • to find the back edge. This one is halfway between the center to the back. Now, these

  • 2 dots represent the vertical peak of the iliac crest. From there, the crest drops down

  • toward the PSIS points behind the Sacrum. So, this section of the top ellipse represents

  • this half of the iliac crest. Not, the entire iliac crest.

  • Now, we're ready for the final step.

  • Step 3 - Draw the rest of the %#$@&* pelvis!

  • Don't worry, I am going to show you how to actually draw this complex pelvis shape in

  • this bucket...

  • Let's start from the top and work our way down.

  • The iliac crest has some thickness, so I'll indicate the top plane.

  • from these points the crest drops down toward the sacrum, so let's find the sacrum. The

  • top of the sacrum is ? of the way down the back plane. This vertical line I drew earlier

  • is the back plane. Ok, so ? from the top is the top of the sacrum.

  • Now we can drop the iliac crest behind the sacrum. From this point of view the left side

  • is very foreshortened and the right side is not.

  • This wedge shape we found is pretty much the final shape. Just round off the corner a little

  • bit to make some more room for the acetabulum.

  • From there, go about a 1/3 of the way down for the height of the cartilage. And then

  • a v shape for the pubic arch.

  • Follow this arch of the ischium around for a bit and then up toward the iliac crest.

  • The side plane of the ilium is concave. Widening at the top to the iliac crest and at the bottom

  • to the acetabulum. The acetabulum is the socket for the femur bone. It's really round and

  • deep.

  • And down here, since we're looking at the inside of this form, we'll see this side plane

  • that shows the thickness.

  • A softened triangular shape for the hole.

  • Let's add the sacrum in the back. Draw a rectangular shape representing the top plane of the sacrum.

  • This top plane tilts forward more than the bucket itself. So this line from back to front

  • will be more vertical than the line of the back to front of the bucket.

  • From the top plane, let's extrude a curved triangular form for the rest of the sacrum.

  • The tip of the coccyx should touch the base of the bucket right in the center.

  • From this front edge of the sacrum, extend a curve around the inlet and connect it to

  • the pubic symphysis.

  • And finally, through this hole of the inlet, we're going to see the back edge of ischium.

  • There you go! A manageable construction of the pelvis. This pelvis has accurately simplified

  • forms, accurate placement of the landmarks, and accurate perspective. Basically, this

  • method of construction enables you to manage the complex forms of the pelvis, while keeping

  • everything where it needs to be.

  • Once we are able to do this same thing for the entire skeleton. We will be able to pose

  • the skeleton as we wish from our imagination. Then, we can attach the muscles to the appropriate

  • origins and insertions, and we'll have a complete body. All from our mind. How cool is that?

  • Assignments

  • So, your assignment for this week is to do 3 drawings using the 3d model. Pose it however

  • you want and draw it the way I described in this video. Start with the bucket, cut out

  • a wedge, and then draw the pelvis inside. The 3d model is available to premium students

  • only. If you're not a premium member, you can download a few screenshots from the link

  • in the description below. (insert link to blog post here)

  • Then, after you did 3 drawings from the 3d model, draw 3 more from your imagination.

  • Upload your drawings to the Facebook group at facebook.com/anatomy4artists. This week

  • I have 6 more examples of how to draw the pelvis. If you want to become a premium member,

  • go to proko.com/anatomy to get extended versions of these videos and a whole bunch of other

  • stuff. That's proko.com/anatomy.

  • Giveaway

  • If you'd like to win premium membership to the Anatomy course, check out the description

  • below for instructions.

  • That's it, thanks for watching! If you're posting your drawings, use hashtag #proko

  • and don't forget to follow me on Facebook and Instagram. Also check out the Anatomy

  • for Artists group on Facebook at facebook.com/groups/anatomy4artists! If you like this video, share it with your

  • friends, and if you want to be updated about new videos click here to subscribe to the

  • Proko newsletter. Buh Bye!

Last time we learned a whole bunch of anatomy about the pelvis, and how a bucket can help

字幕と単語

ワンタップで英和辞典検索 単語をクリックすると、意味が表示されます

B1 中級

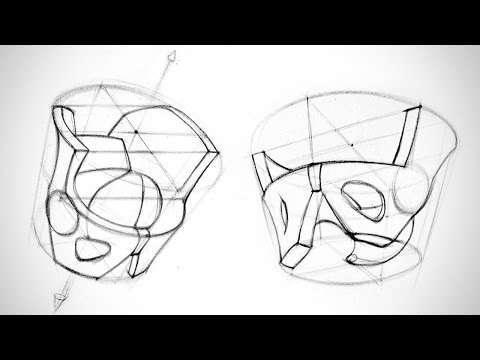
どの角度から見ても骨盤を描く方法 - アーティストのための人体解剖学 (How to Draw the Pelvis from Any Angle - Human Anatomy for Artists)

  • 16 8
    vulvul に公開 2021 年 01 月 14 日
動画の中の単語