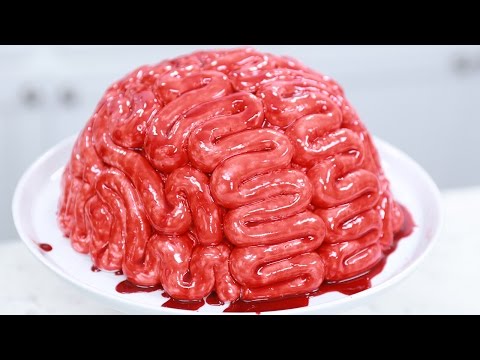
字幕表 動画を再生する
Hey guys, it’s Ro!
Welcome to another Nerdy Nummies.
It’s October, my favorite holiday is Halloween, so I am so excited to make
a creepy recipe today!
I got so many requests from you guys to make the Brain Cake that’s from the
Nerdy Nummies Cookbook, and I’ve never made a video of that so I thought we’d
do that today.
Also, I’ve been getting a lot of requests from you guys for the
marshmallow fondant recipe from the book.
It’s super easy, so if anyone at home is wondering, ‘How do I make fondant at home?’
‘What’s a good, easy recipe that I can do?’
I’m gonna show you guys how to make that today.
It’s really yummy, few ingredients, and it’s microwaveable!
So, today, we are gonna be making a Zombie Brain Cake!
Let’s get started!
The cake that we’re gonna be making today is a red velvet cake.
Here it is in the book and we’re just gonna be following along!
So, the things you will need to make the red velvet cake will be:
2 cups of all purpose flour, 2 cups of sugar, 3 eggs, 1/2 a cup of whole milk,
1 stick of butter which is about 1/2 a cup, 1 cup of sour cream,
1/4 cup of cocoa powder, 1 teaspoon of red gel food coloring, 1/2 a teaspoon
of salt, 1/2 a teaspoon of baking soda and 1 teaspoon of vanilla extract.
Now let’s put it all together!
The first thing that we’re gonna do, in this bowl right here we’re gonna whisk
together our dry ingredients.
Our flour, cocoa powder, our salty-salty, and
baking soda!
Then, mix together until it’s well combined.
The next thing we’re gonna do is in a larger mixing bowl, we’re gonna
cream together our butter and sugar, until everything is well mixed.
Our mixture is ready and now we’re gonna add the eggs 1 at a time,
so we have 3 eggs so we’re gonna add an egg, mix it up, scrape it down with
our spatula.
Add the next egg, mix it up, scrape it down,
and then add the last egg, mix it up, scrape it down!
After our eggs are mixed in we’re gonna add our vanilla extract and
then mix it up one more time!
I set my egg mixture off to the side, now in a small mixing bowl I’m gonna
mix together my sour cream and milk, then whisk it up!
We’ve got all of our mixtures here and now we are gonna put them together!
We’ve got our dry ingredients over here and our liquid ingredients over here.
And we’re gonna alternate adding them into our big mixing bowl.
Add dry, mix it up, add liquid, mix it up, add dry, mix it up, add liquid,
mix it up, add dry, mix it up!
The last thing we need to add is a little bit of red food coloring,
and this is what’s gonna make our red velvet cake red!
Our cake batter is now ready and we’re gonna pour it into a bowl
that we’re gonna put into the oven.
Now over here I have a 1-1/2 quart glass, heat-safe bowl, just make sure that your
bowl is heat-safe.
This is gonna be the shape of our brain cake when it’s upside down.
And I’ve sprayed it with some baking grease so that the cake won’t stick
while it’s baking.
Gonna pour the whole thing in there.
Oooh, it smells so good!
Does this look creepy for Halloween!?
Our red velvet cake is ready to bake, I’m gonna pop this in the oven at
300 degrees, and bake for about an hour and a half.
I’m using a slow-bake method because this cake is a lot denser than normal cakes
that we make and we want it to bake evenly.
Once your cake has baked and has had plenty of time to cool, now we are going
to level the top.
To level the cake I’m gonna be using a large serrated knife!
This is probably the biggest serrated knife I’ve ever seen, if you have a smaller
one that’s fine too.
And I’m gonna be using the top of the bowl as a guide to cut it across to keep it flat.
I’m gonna crumble this up and make some little cake pops with this, mmmmm!
Now our cake is ready to pop out of the pan.
You’re gonna want to place it
onto your final serving plate.
I’m gonna be using a cake stand,
because that’s gonna be the easiest way to decorate.
I’m just gonna pick up my cake.
Oh yeah!
Alright, our cake is ready and now, to decorate!
We are gonna be making some marshmallow fondant!
We’ve got all the ingredients that we need to make marshmallow fondant, we
are gonna be making the recipe from the book and again, it is super, super easy!
All you’re gonna need is 1 - 10 ounce bag of mini marshmallows, 6 cups of
powdered sugar, but I’ve divided them into 2 different bowls because we
add them at different times, and 3 tablespoons of water.
First thing that we’re gonna do is we have our marshmallows in a microwave safe
bowl, because we’re gonna heat these up in the microwave.
we’re gonna pour the water over the top of the marshmallows.
I’m gonna use a spatula, mix them all around.
Then, I’m gonna pop these in the microwave, heat them up for 30 seconds, stir,
put it back in the microwave, 30 seconds, stir, and then back in the microwave
1 more time, 30 seconds, stir.
Our marshmallows are melted and now we’re gonna sift 3 cups of powdered sugar
into a large bowl, and make a little hole in the center.
So I’ve just got a little sifter here, give it a little
tap-tap-tap, tap-tap-tap, tap-tap-tap!
We’ve got our powdered sugar sifted and now we’re gonna make our little hole.
I like to go like this and just, doo-doo-doo, dig a little hole in the middle.
Oh yeah!
Once that’s done we’re gonna pour our melted marshmallows into the hole that
we just made.
Now we’re gonna sift the second measurement of powdered
sugar on top, tap-tap-tap, tap-tap-tap, tap-tap-tap!
I’m gonna mix it up a little bit using my spatula, and then I’m gonna get
my hands in there!
I’m gonna be coating my hands with a little bit of
shortening so that they won’t stick to the marshmallows.
Then I’m gonna knead it together until it’s soft and smooth!
Ah-wah-wah-wah-wah-wah-wah!
Oh ooops! Ooops! Come here!
That’s looking good, now I’m gonna dump this onto the counter to make
it a little bit easier.
I know it looks a little bit crazy right now, but we’re gonna start kneading it
and it’s gonna look really smooth.
And, there you have it, we have marshmallow fondant.
Now we’re gonna use this to make the decorations on our brain cake!
Like my shirt, like these!
Before we roll the fondant into ropes, we are gonna frost our cake.
It doesn’t need to be perfect, so if you see red underneath, that’s totally fine,
we’re just frosting it so that the fondant will stick to it like glue.
So I’m just gonna take a little bit of white buttercream frosting, and a spatula,
start at the top and just work my way down.
Cake is frosted, now we’re gonna roll some ropes out of our fondant, about
1/2 an inch thick.
We’ve got our fondant ropes and now I’m gonna arrange them onto our cake to
look like a brain!
I’m gonna start on 1 side of the brain, weaving my fondant rope, and then
I’ll do the identical design on the other side.
This is just how I’m designing the cake, but you can do whatever you’d like.
Our brain cake is starting to look so cool!
It’s almost creepy enough, I’m pretty proud of it!
I watch a lot of walking dead, and I feel like this is a brain a zombie
would want to eat, but we want to make it a little bit creepier by adding
our bloody topping!
So we are gonna be taking a jar of raspberry jam, a 1/4 cup of water, some
fresh squeezed lemon, and a little red food coloring over to the stove!
In a medium sized saucepan add the raspberry jam, water, fresh squeezed lemon
juice, and some red food coloring.
Turn the heat to medium high, whisk to combine and then bring to a boil.
Once boiling, turn off your heat and bring your raspberry blood back to your
baking station!
Just poured our brain blood mixture into a bowl, I let it sit here until it’s
room temperature.
You don’t want to pour it on top of your cake while it’s
still hot because it will melt your fondant.
And now it’s time for my favorite part, it’s time to decorate!
Using a pastry brush, I’m gonna dip it into our raspberry blood, and then I’m
gonna paint the top of the cake.
Ooooh, yes!
Just keep going until you’ve covered all the white.
Also don’t worry if it drips on the plate because it kind of looks cool,
it looks like special effects!
Ta-da!
Here is the Zombie Brain Cake that we made today, from the
Nerdy Nummies Cookbook!
A big thank you to you guys for suggesting a creepy
treat for Halloween!
I think this is a perfect treat for a holiday party, it’s pretty awesome!
Or, if you have any friends or family who love Zombie things, they would
want to have a little piece of this!
I personally love Walking Dead and Fear the Walking Dead, let me know in
the comments below if you have any favorite zombie series!
Also, I’ll be taking lots of pictures o this cake and posting them on
RosannaPansino.com, Instagram, Twitter, and Facebook!
So you can check out pictures there, check out the recipe, and if you guys make
this cake, please take a picture and send it to me!
I love seeing your baking creations and this is one of my favorite creepy ones!
So please send it this way!
And if you have any other ideas for any other Nerdy Nummies please let me
know, leave me a comment down below and I will do my best to make it happen.
Alright, thanks again you guys, bye-bye!